Friday 26 August 2011

A Woman's Prerogative - Lesson 1

Well, it is a good thing that it's a woman's prerogative to change her mind, because I have done just that.

Although I made a card to send in as my Lesson 1 'In the Classroom with Barbara Gray' assignment, I decided to do some more pattern building and ended up making a card I was a bit happier with.

Here 'tis......


I will be sending this off, so I hope it does the Clarity Stamps justice.

Take care and happy crafting
xx Denise

Thursday 25 August 2011

A bit more clarity

Hello all....

Each day that passes brings us another day closer to Christmas, so it is just as well then that I have been busying myself with making cards.  After working on my pattern building project for In the Classroom with Barbara Gray, I decided to get out some more of my Clarity Stamps and see what I could come up with.  


These came together quite quickly.  I used Hydrangea Big and Juicy ink, the Snowflake Corner and the 'Christmas Greetings' Clarity Stamps.  Since I stamped on Centura Pearl cardstock, I embossed the stamped images with pearl iridescent embossing powder.

Then some embellishments and viola.

Sweet and simple, but sometimes that is all you need.

Take care and happy crafting
xx Denise

Wednesday 24 August 2011

Classroom with Barbara Homework

Hello everyone,

This card is the product of the first "In the Classroom with Barbara Gray" class and 'homework assignment'.


In the Classroom Lesson 1 Assignment
The stamps used are all Clarity Stamps including:

  • Large Butterfly
  • Berry corner & Best Wishes sentiment from the Berry Corner stamp set 
  • Grasses
  • Small birch leaf 
I used the Foliage and Spice Big and Juicy ink pads for all the stamping except the blue, which I did with the  Stormy Sky Distress Ink.  The butterfly is coloured in with Pro Markers.

If I'm honest, getting the pattern to turn out the way I wanted it took a few trials and errors.  Then once I got the pattern right, I ended up ruining another card trying to get the background 'sky' the way I wanted it.  Finally I ended up getting it all right in the card you see above.

I would like to enter this card in the following challenges:


Anything Challenge - Inspired by TV / Films  (Inspired by the Butterfly Effect)


I hope you like the card.  As always, I welcome any and all comments - even constructively negative ones :)

Take care and happy crafting
xxDenise

Monday 22 August 2011

Edelweiss Happy Christmas

Here is a card that I made this evening after looking through some more challenge blogs. 


Clarity Edelweiss / Embossed
I would like to enter this card in the following challenges:

One Stop Craft Challenge - Bold and Bright

Speedy the Cat's Friends Challenge Week 69 - Emboss It

Christmas Stampin' All Year Long - Non Traditional

Tuesday Throwdown - Non-stamped sentiment


The flower is one of the lovely Clarity Stamps which I 'debossed' in silver into extra thick embossing powder mixed with bright blue mica powder.  Both of the white layers are factory embossed papers from Hunkydory.  The card came together quite quickly and I was pleasantly surprised with how the flower turned out as I had never done debossing, nor had I ever tried tinting ultra thick embossing powder.

It seems that from the depths of emotion comes creativity.  I don't think this is news to anyone, except perhaps me.  I always believed it about other people, but never about myself. 

I hope you like the card.  I want to say a big thank you to all the blogs that hold challenges.  Having the challenges to give my crafting a general direction has been a godsend this past week by keeping my mind occupied and giving me an outlet for some of my feelings.

Take care and happy crafting
xx Denise

Of mice and mice

In my quest to keep a busy brain, I have completed yet another challenge card.  This one is for the Penny Black Saturday Challenge - Shabby Chic.

Penny Black stamps are some of my favourites, and the only difficulty was deciding on a stamp to use for the card.  This is what I ended up with.


Penny Black love mice - Shabby Chic

I used a crackling technique with white over a blue/gray.  I tried stamping the image directly on the crackled cardstock, but as I suspected, I was not able to colour it due to the paint on the card being water based.  I did not dare try to paint the lovely mice as they are quite tiny and I am not a great painter, so instead I stamped the image, coloured it with flex markers and promarkers and cut it out. I stamped a few extra flowers as well and coloured them with flex markers.  The crackled card and the card directly behind the mice are distressed with old paper and spun sugar distress ink.  The 'quilted' paper is from the Glitter Girls (I think).   The lace is coloured using spun sugar distress ink as well.  Finally, the sentiment is stamped on tan card using versamark and heat embossed with Artic Lake Lustre Cosmic Shimmer embossing powder.

I am quite pleased with how the card turned out and I hope you are too.

Take care and happy crafting,
xx Denise

Sunday 21 August 2011

Blue Christmas

This card is one that will hopefully give a different meaning to 'blue christmas'. 


I used the tree stamp from the Polka Doodles Christmas Fun clear stamp set and coloured it using promarkers.  I distressed around the tree with green and blue distress ink.  The snow on the tree and the ground is flower soft pearl white and the snow in the air is white liquid pearls and a tad of flower soft for good measure.

The card and the blue layers are made from pearl cardstock.  The patterned paper is from Papermania.

I am entering this card in the Winter Wonderland 'Cards for Men/Boys' challenge.

Thanks as always for looking.  I hope you like it and would love to hear any comments you may have.

Take care and happy crafting
xx Denise

Christmas is coming!

What better way to keep busy than getting ahead on some Christmas cardmaking.  In the spirit of season, I made this card.

Sparkling Elf
I used Elfie from Polkadoodles Magical Winter CD by Nikky Hall.  She and the gifts are coloured in with Letraset Flex Markers and embellished with Stickles and Liquid Pearls.  The snowflakes are punched out of light blue glitter paper.

Perhaps I used a bit more 'bling' than I would normally put on a card, but once I got started I couldn't stop!

I would like to enter this card in the following challenges:

Crafter's Companion - Challenge 15 - Glitter and Glitz

Fussy and Fancy Friday Challenge - Use a Lot

Thank you for taking the time to check out my blog and my creations.  Any feedback is welcomed!

Take care and happy crafting
xxDenise

Tatty Teddy with Poinsettias

Here is another creation that I have been working on.  I used the docrafts Digital Designer with the Tatty Teddy CD rom as well as images from the PMA Christmas Past CD rom to put the image together, including the sentiment.


Tatty Christmas Wishes

Tatty is coloured using Letraset Flex Markers.  The poinsettias are coloured with promarkers.  After colouring I cut the images out, and went over the sentiment using a green wink of stella marker.  I used a Papermania patterned paper for the backing behind the poinsettia wreath, and some red glitter card for the layer underneath. 

I am really looking forward to seeing what else I can come up with using the digital designer and Tatty Teddy.  He is one of my favourite characters!

I would like to enter this card in:
Totally Papercrafts Challenge - Christmas in August
Colour Create Challenge - Blue, Green, White, Red and Brown

and as a second entry in:
Christmas Crafting - Cute Christmas

Thanks for looking!  I know I say this every time, but I hope you like the card, and I would absolutely love to hear any comments (good or bad).

Take care and happy crafting!
xxDenise

Think you can find my treasure?

Due to some personal / family issues, I have not done as much card making this week.  However, I realised that getting my mind on something else, like making challenge cards, might help me through this trying time in my life.

We had a friend over and as we are all crafters, we decided to pick a challenge to make cards for.  It was unanimous that we do this week's Passion for Promarker Challenge ' which is 'a pirate's life for me'.

Here is the card I ended up with....


Treasure Hunt
 I got this great girl pirate digi stamp from  C.C. Designs via the all that scraps website.  She is coloured with promarkers as are the little images on the map.  I used super smooth paper for the map.  After colouring the images I distressed the map with old paper distress ink.  Then I crumpled the paper and distressed it a bit more with tea dye distress ink.  I used some brown card and mauve coredinations paper, which was sanded, for the layers under the map and main image.

This was a fun card to make.  Thank you very much to Debs at Passion for Promarkers for such a fun challenge!

I hope you like the card.  As always, comments are greatly appreciated, whether they be positive or negative.

Happy crafting
xxDenise

Monday 8 August 2011

Things that make you go "Awww"

Ok, so maybe when you think cute and Christmas, Santa himself may not be the first thing that comes to mind, but when it is the adorable Santa straight from the imagination of Nikki Hall, I couldn't help but go 'Aww'. That's why when I saw the 'Cute Christmas' theme for the Christmas Crafting blog challenge I knew what I had to do!

Santa was stamped with black memento and coloured with pro markers. The tree was printed from one of Nikki Hall's CDs (will update with which asap) and was coloured using the Letraset flex and pro markers. Both images were embellished with Zig Wink of Stella pens. The 'dots' on the tree are various coloured Stickles.

The backing paper is from Polka doodles Sundae of Seasons winter section. The layers are green glitter card and gold satin card.

I thought about putting a bow or candy cane or something else on the cardl but decided to leave it sweet and simple.

Thank you for checking out my blog and my creations. I sincerely appreciate all my followers and welcome any and all 'constructive' comments.

More to come soon.........

I have to do some 'homework' from this past Saturdays class with Barbara Gray and Clarity Stamp, so be prepared for some patterns!

Happy Crafting
xx Denise

Sunday 7 August 2011

Me and My Flexies

As another Sunday night is coming to a close, signaling the end of a far too short weekend, I find myself a bit more disappointed than usual. The reason for my additional dismay as I ready for another week of work is that I will have much less time to play with my new Letraset Flex Markers. I got them yesterday and have barely put them down since I unpacked them.

These alcohol markers with brush tips are lovely to work with. They did take a bit of getting used to, but I seemed to get the nack quite quickly.

Here is my first effort.

This gal is from one of Nikki Hall's CDs, though I will need to double check which. I was so excited to try out my pens, I was immersed in a flurry of images before I realised what I was doing! I found it a bit challenging to ge the colours I wanted at first, especially for the fence and the bricks as the sets don't have a brown to speak of. I was pkeasantly surprised to find that I was able to combine and blend different colours to end up with the colours you see above.

This next one was used to make a 'leaving' card for a work colleague.

I already planned to use the elephant stamp and the sentiment that came with it, but I had originally expected to colour it with promarkers. However, I got sidetracked on other projects and b the time I was ready t do te card, I had the flexies. I think the soft quality that is achieved with the flex markers compliments the stamp's style and the card's intended tone, so I guess sometimes things do happen for a reason!

.....and one more for good measure and in the name of helping a fellow crafter. I started this picture to experiment with blending some of the more vibrant flex marker colours to see if there was any unexpected bleeding of the colours. After I had finished the experimental bit, I liked the look of the image so much that I decided it deserved to be a proper card.

I have to say I am really pleased with my new flexies. The next thing for me will be to use them in conjunction with pro makers. The next thing for Letraset will be to bring out more colours in the flex markers...AND FAST!

As always, I would love to hear your thoughts (whether they be positive or negative)

Happy Crafting
xxDenise

Wednesday 3 August 2011

Assorted Christmas

Hello again.

It seems I have been well and truly bitten by not only the card making bug, but most specifically the Christmas Card making bug.  I now have about 5 times the number of Christmas Cards I will need for my list, but that's ok since I will be selling cards for Children in Need in November.  I guess I can carry on making more then!


These are two that I have done over the last few days.
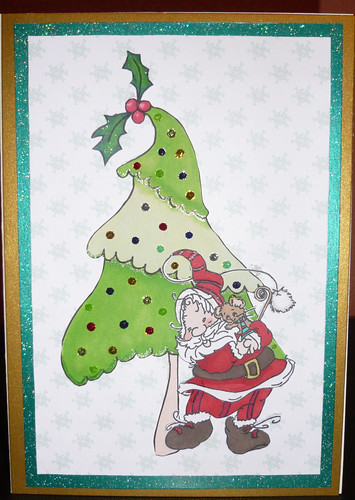
Marble ink backed Card-io tree with festive bouquet

This card was made using a variety of Card-io / Majestix stamps including the Festive Bouquet and the Celebratrees set.  The 'garland' was stamped in versamark and embossed in gold glitter powder.  I used versacolour inks for the tree components.  If you are interested I can detail which colours, but I don't want to bore you :)

I distressed the top layer with denim blue distress ink.  The red layer is a textured paper with almost a faux leather appearance.  The bottom layer was made using the My Craft Studio marbling inks on non-coated paper.   The Happy Christmas is a peel off.


*****************************************************************************

This next card just sort of fell together during a play I was having with my new nesties dies.

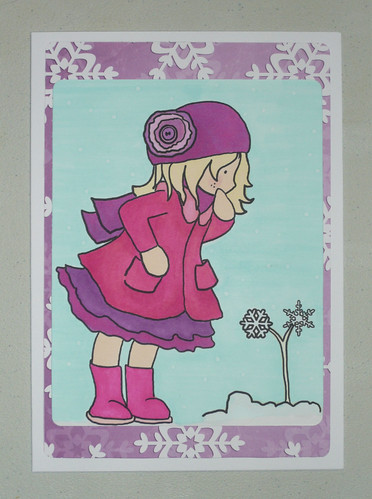
Glitter Girls Joy, Wow, Nancy Watt Paper & Nesties
The Joy is a Glitter Girls stamp which I stamped with Memento ink and then stamped over it with a snowflake stamp from Polka Doodles using versamark.  I then embossed the snowflakes with Wow white glitter embossing powder.  I coloured the 'Joy' with a cyan Promarker and touched up the outline of the word with black Promarker.

The two light blue shapes were made by first embossing the paper with a snowflake embossing folder using the Cuttlebug.  Then, with the Peony Nestabilities dies from Spellbinders, I cut and embossed the shapes.   I sanded the coredinations paper to bring out the snowflakes, and dressed them a bit with the clear wink of stella pen.  The large white snowflake was also made with a Spellbinders die, but was cut out of Centura Pearl cardstock.  The backing paper I used is one of Nancy Watt's lovely designs.  Finally, I thought the peel off border at the top gave it a nice touch.

As usual, feedback is greatly appreciated so I know what works and what doesn't.  Because I would actually like to sell some of the cards for charity, it would help to get an idea of which designs 'people' like.

Anyway, I really should be getting to sleep, so I will end for now.  I hope you are enjoying my creations.

Happy Crafting
xxDenise

Tuesday 2 August 2011

Poinsettia Bear

I made this card to enter in the Christmas Crafting blog challenge.  I hope you like it.

Pink and Green Milton with Poinsettia


I used a pink card and stamped it with an poinsettia stamp and clear versamark.  Then I embossed the poinsettias with Cosmic Shimmer Clear Embossing Powder which brought out the pink of the card very nicely.  Next I brayered the whole pink card using pine needles distress ink.

The main image is the Milton with Poinsettia stamp from Milton and Co.  I stamped it using black memento ink and coloured it using pro markers.

The rest of the card kind of came together naturally.  I used another layer of the pink card left plain, then a printed paper (red with gold stars).  The holly embellishments and the pink and green ribbon were bits in my stash.

After the card was all assembled, I felt it need a little something else, so Milton's scarf got a wink of stella and the green layer ended up outlined with Platinum liquid pearls.


I really enjoyed this project and it was nice to see it develop from idea to idea, into eventually the card you see here.

As always, please let me know how I am doing.  All comments, whether positive or negative, are welcomed as they help me grow ;)

Happy Crafting
xxDenise

My Weight Loss Journey